1 配置静态 Eth-trunk
1.1 问题
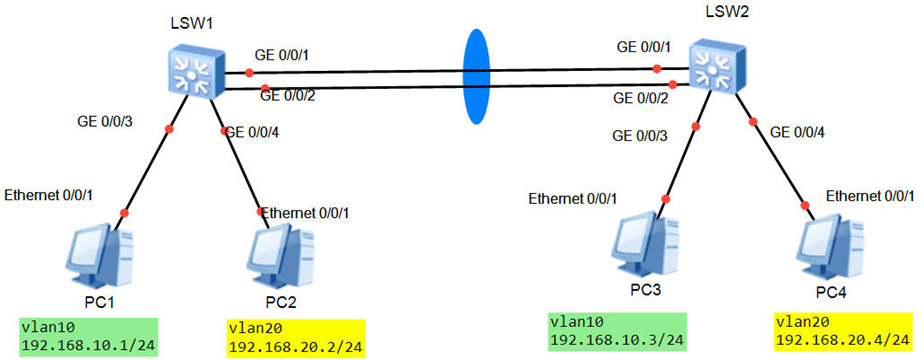
1)交换网络中存在2个 VLAN – 10 和 20
2)每个VLAN的IP地址为:192.168.xx.0/24(xx为 vlan 号)
3)对交换机之间的链路进行链路捆绑,增加互联带宽
4)确保同 VLAN的 PC 之间互通
1.2 方案
使用eNSP搭建实验环境,如图-1所示。
 图-1
图-1
1.3 步骤
[hidecontent type=”payshow”]
实现此案例需要按照如下步骤进行。
1)如图配置PC的IP地址
2)在SW1/2配置基本信息
- 创建 vlan 10 和 20
- 配置交换机与PC之间的链路为 Access,并加入到正确的 VLAN
3)对SW1/2之间的链路进行链路捆绑
- [SW1]interface eth–trunk 1
- [SW1–Eth–Trunk1]mode manual load–balance
- [SW1–Eth–Trunk1]trunkport g0/0/1
- [SW1–Eth–Trunk1]trunkport g0/0/2
- [SW1–Eth–Trunk1]quit
- [SW2]interface eth–trunk 1
- [SW2–Eth–Trunk1]mode manual load–balance
- [SW2–Eth–Trunk1]trunkport g0/0/1
- [SW2–Eth–Trunk1]trunkport g0/0/2
- [SW2–Eth–Trunk1]quit
4)显示Eth-Trunk信息,如图-2所示
 图-2
图-2
5)把 Eth-trunk 配置为 Trunk
- [SW1]interface eth–trunk 1
- [SW1–Eth–Trunk1]port link–type trunk
- [SW1–Eth–Trunk1]port trunk allow–pass vlan all
- [SW1–Eth–Trunk1]quit
2 配置动态Eth-trunk
2.1 问题
1)交换机之间的多个链路通过 LACP 协议自动捆绑
2)配置 SW2 为 LACP 的主动端,优先级设置为100、
3)交换机之间的最大连接带宽为2G
2.2 方案
使用eNSP搭建实验环境,如图-3所示。
 图-3
图-3
2.3 步骤
实现此案例需要按照如下步骤进行。
1)如图配置PC的接口IP地址
2)在SW1/2上配置基本信息
- 创建 vlan 10 和 20
- 配置交换机与PC之间的链路为 Access,并加入到正确的 VLAN
3)对SW1/2之间的链路进行捆绑
- [SW1]interface eth–trunk 1
- [SW1–Eth–Trunk1]mode lacp–static
- [SW1–Eth–Trunk1]trunkport g0/0/1
- [SW1–Eth–Trunk1]trunkport g0/0/2
- [SW1–Eth–Trunk1]trunkport g0/0/3
4)配置sw2 eth-trunk的主动端,优先级为100
- [SW2]lacp priority 100
5)配置最大带宽为2G,并开启 LACP的抢占功能
- [sw2–Eth–Trunk1]max active–linknumber 2
- [sw2–Eth–Trunk1]lacp preempt enable
6)把 Eth-trunk 配置为 Trunk(SW1/2都要配置)
- [SW2]interface eth–trunk 1
- [SW2–Eth–Trunk1]port link–type trunk
- [SW2–Eth–Trunk1]port trunk allow–pass vlan all
- [SW2–Eth–Trunk1]quit
3 链路聚合综合实战
3.1 问题
1) PC1和PC2属于 vlan 12,网段为 192.168.12.0/24,网关IP为:192.168.12.254
2) PC3和PC4属于 vlan 34,网段为 192.168.34.0/24,网关IP为:192.168.34.254
3)确保设备之间的互联链路使用最大的互联带宽,并且没有环路发生
4)确保不同的PC之间可以互通
3.2 方案
使用eNSP搭建实验环境,如图-4所示。
 图-4
图-4
3.3 步骤
实现此案例需要按照如下步骤进行。
1)路由器配置 r1、r2
每个路由器上各建两个eth-trunk端口,分别连接路由器和三层交换机,并配置路由
- R1:
- interface eth–trunk 7
- undo portswitch –> 关闭2层功能,开启三层IP地址功能
- mode lacp–static
- trunkport gi0/0/0
- trunkport gi0/0/1
- ip address 192.168.12.1 24
- quit
- interface eth–trunk 1
- undo portswitch –> 关闭2层功能,开启三层IP地址功能
- mode lacp–static
- trunkport gi2/0/1
- trunkport gi2/0/2
- ip address 192.168.10.254 24
- quit
- ip route–static 192.168.20.0 24 192.168.12.2
- R2:
- interface eth–trunk 7
- undo portswitch –> 关闭2层功能,开启三层IP地址功能
- mode lacp–static
- trunkport gi0/0/0
- trunkport gi0/0/1
- ip address 192.168.12.2 24
- quit
- interface eth–trunk 2
- undo portswitch –> 关闭2层功能,开启三层IP地址功能
- mode lacp–static
- trunkport gi2/0/1
- trunkport gi2/0/2
- ip address 192.168.20.254 24
- quit
- ip route–static 192.168.10.0 24 192.168.12.1
2)配置三层交换机 sw1/3/4
在交换机上创建 vlan ,并将设备之间的链路进行捆绑,并配置为 Trunk
- [sw1]vlan 10
- [sw3]vlan 10
- [sw4]vlan 10
- [sw1]interface Eth–Trunk 1
- [sw1–Eth–Trunk1]mode lacp–static
- [sw1–Eth–Trunk1]trunkport g0/0/1
- [sw1–Eth–Trunk1]trunkport g0/0/2
- [sw1–Eth–Trunk1]port link–type access
- [sw1–Eth–Trunk1]port default vlan 10
- [sw1–Eth–Trunk1]quit
- [sw1]interface Eth–Trunk 12
- [sw1–Eth–Trunk12]mode lacp–static
- [sw1–Eth–Trunk12]trunkport g0/0/3
- [sw1–Eth–Trunk12]trunkport g0/0/4
- [sw1–Eth–Trunk12]port link–type trunk
- [sw1–Eth–Trunk12]port trunk allow–pass vlan all
- [sw1–Eth–Trunk12]quit
- [sw1]interface Eth–Trunk 14
- [sw1–Eth–Trunk14]mode lacp–static
- [sw1–Eth–Trunk14]trunkport g0/0/5
- [sw1–Eth–Trunk14]trunkport g0/0/6
- [sw1–Eth–Trunk14]port link–type trunk
- [sw1–Eth–Trunk14]port trunk allow–pass vlan all
- [sw1–Eth–Trunk14]quit
- [sw3]interface Eth–Trunk 13
- [sw3–Eth–Trunk13]mode lacp–static
- [sw3–Eth–Trunk13]trunkport g0/0/3
- [sw3–Eth–Trunk13]trunkport g0/0/4
- [sw3–Eth–Trunk13]port link–type trunk
- [sw3–Eth–Trunk13]port trunk allow–pass vlan all
- [sw3–Eth–Trunk13]quit
- [sw4]interface Eth–Trunk 14
- [sw4–Eth–Trunk14]mode lacp–static
- [sw4–Eth–Trunk14]trunkport g0/0/5
- [sw4–Eth–Trunk14]trunkport g0/0/6
- [sw4–Eth–Trunk14]port link–type trunk
- [sw4–Eth–Trunk14]port trunk allow–pass vlan all
- [sw4–Eth–Trunk14]quit
3)配置二层交换机 sw2、sw5、sw6
在交换机上创建 vlan ,并将设备之间的链路进行捆绑,并配置为 Trunk
- [sw2]vlan 20
- [sw5]vlan 20
- [sw6]vlan 20
- [sw2]interface Eth–Trunk 1
- [sw2–Eth–Trunk1]mode lacp–static
- [sw2–Eth–Trunk1]trunkport g0/0/1
- [sw2–Eth–Trunk1]trunkport g0/0/2
- [sw2–Eth–Trunk1]port link–type access
- [sw2–Eth–Trunk1]port default vlan 20
- [sw2–Eth–Trunk1]quit
- [sw2]interface Eth–Trunk 25
- [sw2–Eth–Trunk25]mode lacp–static
- [sw2–Eth–Trunk25]trunkport g0/0/3
- [sw2–Eth–Trunk25]trunkport g0/0/4
- [sw2–Eth–Trunk25]port link–type trunk
- [sw2–Eth–Trunk25]port trunk allow–pass vlan all
- [sw2–Eth–Trunk25]quit
- [sw2]interface Eth–Trunk 26
- [sw2–Eth–Trunk26]mode lacp–static
- [sw2–Eth–Trunk26]trunkport g0/0/5
- [sw2–Eth–Trunk26]trunkport g0/0/6
- [sw2–Eth–Trunk26]port link–type trunk
- [sw2–Eth–Trunk26]port trunk allow–pass vlan all
- [sw2–Eth–Trunk26]quit
- [sw5]interface Eth–Trunk 25
- [sw5–Eth–Trunk25]mode lacp–static
- [sw5–Eth–Trunk25]trunkport g0/0/3
- [sw5–Eth–Trunk25]trunkport g0/0/4
- [sw5–Eth–Trunk25]port link–type trunk
- [sw5–Eth–Trunk25]port trunk allow–pass vlan all
- [sw5–Eth–Trunk25]quit
- [sw6]interface Eth–Trunk 26
- [sw6–Eth–Trunk26]mode lacp–static
- [sw6–Eth–Trunk26]trunkport g0/0/5
- [sw6–Eth–Trunk26]trunkport g0/0/6
- [sw6–Eth–Trunk26]port link–type trunk
- [sw6–Eth–Trunk26]port trunk allow–pass vlan all
- [sw6–Eth–Trunk26]quit
4)如图配置PC机的IP地址
5)测试不同PC之间的互通性
4 Mux Vlan综合案例
4.1 问题
1)VLAN 100 是主 vlan ,vlan 200和 300 是辅助 vlan
2)VLAN 200 是隔离vlan, VLAN 300 是组 vlan
3)PC1/2属于 vlan 200,PC3/4 属于 vlan 300
4)确保 PC1/2 与 PC3/4 不能互相访问,但是都可以访问 Server1
5)配置每个设备的IP地址,如图所示
4.2 方案
使用eNSP搭建实验环境,如图-5所示。
 图-5
图-5
4.3 步骤
实现此案例需要按照如下步骤进行。
1)如图配置 PC 、Server1 和 R1 的接口IP地址
2)配置 SW1 的 Mux Vlan 功能
- SW1:
- vlan batch 100 200 300
- vlan 100
- mux–vlan
- subordinate group 300
- subordinate seperate 200
- quit
- port–group group–member gi0/0/1 gi0/0/2
- port link access
- port default vlan 200
- port mux–vlan enable // 端口启用 mux vlan 功能
- quit
- port–group group–member gi0/0/3 gi0/0/4
- port link access
- port default vlan 300
- port mux–vlan enable // 端口启用 mux vlan 功能
- quit
- interface gi0/0/10 // 端口加入主 vlan
- port link access
- port default vlan 100
- port mux–vlan enable
- quit
3)测试 PC 与 Server1 之间的通信
5 端口隔离 综合案例
5.1 问题
1)PC1/2/3/4都属于同一个 VLAN 100
2)IP地址所在网段为 192.168.100.0/24,网关地址为 192.168.100.254
3)PC1/2不能互相访问,但是都可以访问 PC3/4
4)同时,所有的PC都可以访问 Server1
5.2 方案
使用eNSP搭建实验环境,如图-6所示。
 图-6
图-6
5.3 步骤
实现此案例需要按照如下步骤进行。
1)如图配置 PC 、R1、Server1的IP地址和网关
2)在SW1上配置端口隔离
- vlan 100
- quit
- port–group group–member gi0/0/1 to gi0/0/5
- port link access
- port default vlan 100
- quit
- port–group group–member gi0/0/1 gi0/0/2
- port–isolate enable group 1 -> 开启端口隔离,并加入组1
- quit
3)测试 PC 与 Server1 之间的连通性
[/hidecontent]

